VR Headsets have become more and more common in our daily lives. Google Daydream VR is a VR headset and controller by Google that lets you explore new worlds, kick back in your personal VR cinema, and play games that put you at the center of action. With this powerful Google Daydream VR,you could freely watch creditable 3D movies and films with Google Pixel series phones, which are Daydream-ready phone. So, we will quickly walk with you through how to play 3D movie on Google Daydream, as if you were watching a movie on a big-screen 3D TV that just happened to be on your head. Here's the basic requirements you should consider to let 3D movies play on your Google Daydream:1. A 2D or 3D movie. If no 2D movies existing and you don't like to buy a 3D movie from Amazon or Plex, you could use the 3rd party APP as 3D movies maker shortcut such as Dimo Video Converter Ultimate to help you convert 2D to 3D quickly.2. A phone. No matter what Android or Pixel you have, the working one will be OK which I'm sure your phone in hand can perfectly fits the Google Daydream.The one extra thing you might need, depending on the 3D movie you have, is an app to play it for the Google Daydream. The reason you need a special app — VR player (there are top 5 free VR video players available for options) to play a 3D movie because when you play any sort of video that's meant for a VR headset, it's split into two windows. However, if the VR players failed to play your ready-made 3D videos on Google Daydream, there are several factors to consider, including aspect Ratio, resolution, duration and video format. Different VR video players might have different supports for video formats, resolutions, aspect ratio, etc., please refer to the best video formats for different VR players and VR headsets to adjust and convert your 3D video formats by the help of Dimo Video Converter Ultimate.Google Pixel smartphones best movie format: H.264 MP4Google Pixel smartphones not supported format: Blu-ray, DVD, ISO, MKV, WMV, M4V, MTS, MOV, M2TS, VOB, FLV, etc.How to Convert 2D/3D movies to Google Daydream VR? Dimo Video Converter Ultimate is a professional 3D Video converter and VR video maker, which comparatively has better output quality, in particular HD videos and intuitive interface. With it, you can fast convert 3D Blu-ray, DVD, 3D YIFY, 3D YouTube, 3D MTS, MKV, WMV, MOV, etc. to DayDream View supported file type . Best of all, this software allows you to convert 2D/3D to 3D videos such as MKV Top-bottom 3D Video, MP4 Top-bottom 3D Video, MP4 Side-by-Side 3D video, which can be played on Google Daydream VR perfectly. If you are Mac users, please turn to Dimo Video Converter Ultimate for Mac. Now, we will give a detailed guide on the whole process from converting 2D/3D to Google Daydream VR supported video.Free Download Dimo Video Converter Ultimate (Win/Mac):
 Other Download:
Guide to transcode 2D/3D to Google DayDream for watchingStep 1. Import 2D/3D clips Click "Add File" to add 2D/3D files to it. After the files are loaded, you can preview them by clicking its icon on the 3D conversion task bar to activate the build-in video player; And if you like to take snapshots of your favorite movie scene, then please hit "Edit" and tap camera icon to get pictures by screenshot.
Other Download:
Guide to transcode 2D/3D to Google DayDream for watchingStep 1. Import 2D/3D clips Click "Add File" to add 2D/3D files to it. After the files are loaded, you can preview them by clicking its icon on the 3D conversion task bar to activate the build-in video player; And if you like to take snapshots of your favorite movie scene, then please hit "Edit" and tap camera icon to get pictures by screenshot. 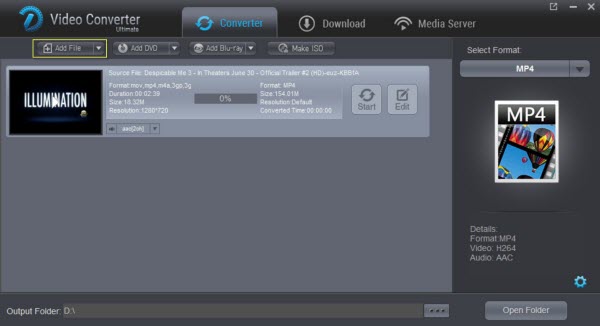 Step 2. Choose an output format.Based on the support range of your VR player, choose an output video format. This VR video format converter embraces almost all video formats and has 410+ built-in profiles for Google, Apple, Android, Microsoft and Sony devices. MP4 is recommended for Google Daydream VR. You are enabled to adjust the bitrate and resolution parameters for different needs. Tip: Click Settings to adjust the parameters like video codec, video bitrate, video frame rate, audio sample rate, audio channel. 1920x1080 compressed side-by-side 3D should be resampled to 1920x540 resolution full side-by-side resolution. And keep audio in AAC or MP3.Step 3. Set the Matching 3D modesThe 3D Video Converter program provides three kinds of 3D effects, you can choose one that match your Oculus Rift CV1, such as Side-by-side (Left-Right) or Top-Bottom.
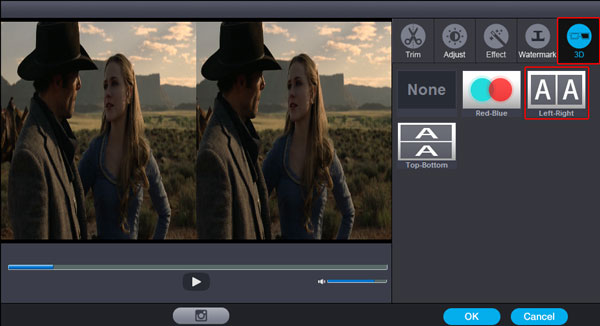 Step 4. Start 3D VR converting for Google Daydream VRYou can define the Destination Folder for saving the output 3D VR file and set everything (e.g., encoder, trimming or clipping, merge videos). Afterwards, you are good to go by tapping "Start" button. The converted 3D VR video can be in the best format and played by VR video player on Pixel/Android phones or device after a time. After conversion, how to transfer 3D VR videos to your Pixel/Android phones for viewing on Google Daydream.Free Download or Purchase Dimo Video Converter Ultimate:
 Need the lifetime version to work on 2-4 PCs so that your friends and family can instantly broaden their entertainment options? Please refer to the family license here.
  Kindly Note:The price of Dimo Video Converter Ultimate for Windows is divided into 1 Year Subscription, Lifetime/Family/Business License: $43.95/Year; $45.95/lifetime license; $95.95/family license(2-4 PCs); $189.95/business pack(5-8 PCs). Get your needed one at purchase page.Contact us or leave a message at Facebook if you have any issues.Related Articles:
Source: How to Play 3D movies on Google Daydream
Kindly Note:The price of Dimo Video Converter Ultimate for Windows is divided into 1 Year Subscription, Lifetime/Family/Business License: $43.95/Year; $45.95/lifetime license; $95.95/family license(2-4 PCs); $189.95/business pack(5-8 PCs). Get your needed one at purchase page.Contact us or leave a message at Facebook if you have any issues.Related Articles:
Source: How to Play 3D movies on Google Daydream
Today, most high-definition televisions, tablets, and laptops can play videos from USB flash drives. If you have tons of DVDs, you may be wondering if there is a way to save video from DVD to USB flash drive for playback on those devices. But unfortunately, USB can't read DVD. In fact, it is easy to backup your favorite DVD movies to USB Flash Drive as long as you got a DVD Ripper in hand.  Here Dimo Video Converter Ultimate is a wise choice to rip and convert DVD to USB in digital video files like MP4, AVI, MOV, etc. with super fast conversion speed and excellent image and sound quality. The process is straightforward and a mass of preset formats are built for output. What's more, with this DVD ripping tool, you can easily backup your DVD disk with whole content copy. CUDA acceleration will bring you fast conversion speed. If you are a Mac user, you can turn to Dimo Video Converter Ultimate for Mac (MacOS Sierra and El Capitan included), which has the same function as the Windows version. The article would show you how to rip DVD to USB for playback step by step.Free Download Dimo Video Converter Ultimate (Win/Mac): Other Download:
How to rip and copy a DVD to a USB Flash DriveStep 1. Load DVD moviesInsert the DVD disc into your computer's DVD drive and run DVD Ripper. You can click the "Add DVD" button to load the DVD files to the program. DVD ISO/IFO, VIDEO_TS folder are supported also.Step 2. Specify output formatAs has been stated above, USB, iPad, iPhone, Galaxy devices, etc supports MP4, etc video files. So you can just select "Format > Video" as the output video format. Step 3. Advanced Video/Audio settingsClick "Settings" button to do corresponding settings regarding to video, audio like video codec, file size, video bitrate, frame rate, etc.
Here Dimo Video Converter Ultimate is a wise choice to rip and convert DVD to USB in digital video files like MP4, AVI, MOV, etc. with super fast conversion speed and excellent image and sound quality. The process is straightforward and a mass of preset formats are built for output. What's more, with this DVD ripping tool, you can easily backup your DVD disk with whole content copy. CUDA acceleration will bring you fast conversion speed. If you are a Mac user, you can turn to Dimo Video Converter Ultimate for Mac (MacOS Sierra and El Capitan included), which has the same function as the Windows version. The article would show you how to rip DVD to USB for playback step by step.Free Download Dimo Video Converter Ultimate (Win/Mac): Other Download:
How to rip and copy a DVD to a USB Flash DriveStep 1. Load DVD moviesInsert the DVD disc into your computer's DVD drive and run DVD Ripper. You can click the "Add DVD" button to load the DVD files to the program. DVD ISO/IFO, VIDEO_TS folder are supported also.Step 2. Specify output formatAs has been stated above, USB, iPad, iPhone, Galaxy devices, etc supports MP4, etc video files. So you can just select "Format > Video" as the output video format. Step 3. Advanced Video/Audio settingsClick "Settings" button to do corresponding settings regarding to video, audio like video codec, file size, video bitrate, frame rate, etc.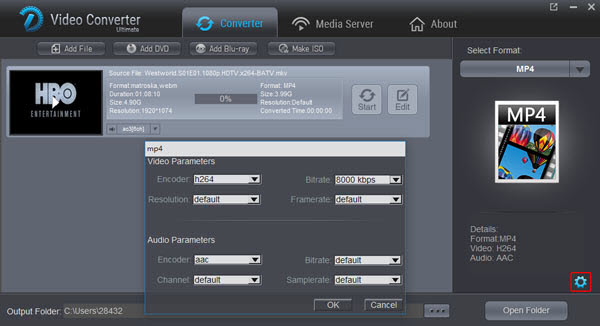 Step 4. Trim/Edit DVD filesJust click "Edit" to trim the DVD videos to get the very part you want. Besides trimming, cropping, adding watermark, adjusting special effect, are well supported as well.Step 5. Start converting DVD to USB for backupWhen all these settings are ready, you can click the "Start" button to begin the DVD to USB conversion in the format you wish. When the ripping is done, you can click on "Open" button to locate the ripped videos. You can add the converted files to USB directly for playback on iPhone, iPad, Android, Surface, BlackBerry, Galaxy, PS4 Pro, PS4/3, PSP, PS Vita, WDTV, smart TV and more media devices, Have a good time!Free Download or Purchase Dimo Video Converter Ultimate: Need the lifetime version to work on 2-4 PCs so that your friends and family can instantly broaden their entertainment options? Please refer to the family license here. Kindly Note:The price of Dimo Video Converter Ultimate for Windows is divided into 1 Year Subscription, Lifetime/Family/Business License: $43.95/Year; $45.95/lifetime license; $95.95/family license(2-4 PCs); $189.95/business pack(5-8 PCs). Get your needed one at purchase page.Contact us or leave a message at Facebook if you have any issues.Related Articles:
Source: Upload Blu-ray Movies to Cloud Storage
Step 4. Trim/Edit DVD filesJust click "Edit" to trim the DVD videos to get the very part you want. Besides trimming, cropping, adding watermark, adjusting special effect, are well supported as well.Step 5. Start converting DVD to USB for backupWhen all these settings are ready, you can click the "Start" button to begin the DVD to USB conversion in the format you wish. When the ripping is done, you can click on "Open" button to locate the ripped videos. You can add the converted files to USB directly for playback on iPhone, iPad, Android, Surface, BlackBerry, Galaxy, PS4 Pro, PS4/3, PSP, PS Vita, WDTV, smart TV and more media devices, Have a good time!Free Download or Purchase Dimo Video Converter Ultimate: Need the lifetime version to work on 2-4 PCs so that your friends and family can instantly broaden their entertainment options? Please refer to the family license here. Kindly Note:The price of Dimo Video Converter Ultimate for Windows is divided into 1 Year Subscription, Lifetime/Family/Business License: $43.95/Year; $45.95/lifetime license; $95.95/family license(2-4 PCs); $189.95/business pack(5-8 PCs). Get your needed one at purchase page.Contact us or leave a message at Facebook if you have any issues.Related Articles:
Source: Upload Blu-ray Movies to Cloud Storage
Windows Media Player has various multimedia functions; it can be used to play movies, documentaries, audio-video clips etc. In some cases, MOV files are not recognized in Windows Media Player. One of the main reasons that MOV files may fail to play is due to technical issues. That may occur when the user does not have the plug-ins needed to play the MOV videos. Another problem could be with the QuickTime MOV codec. Installing a QuickTime player could solve the codec problem. However, the QuickTime player is big-sized, and it will install junks to your computer. In this article, we aim to work out the fastest solution to help you play QuickTime with Windows Media Player smoothly. Actually, it's not as difficult as you imagine. What you need is a just a common video converter like Dimo Video Converter Ultimate to help you watch MOV on Windows Media Player without any hassle. And you could get wonderful output files and never worry about out of audio/video sync. More than that, it also provides an access to touch up QuickTime MOV videos, which including trimming, cropping, appending artistic effects and more. If you are Mac users, please turn to Dimo Video Converter Ultimate for Mac (El Capitan, macOS Sierra included). The guide below will teach you how to convert and import MOV to Windows Movie Maker so you can make engaging movies with MOV, MP4, WMV and other video files.Free Download Dimo Video Converter Ultimate (Win/Mac): Other Download:
How to convert QuickTime MOV to Windows Media Player?Step 1. Add QuickTime MOV videoStart up the QuickTime MOV to Windows Media Player converter, and then click "Add File" to import all QuickTime MOV files.Step 2. Choose output compatible format with Windows Media PlayerClick the "Select Format" menu, select Windows Media Player friendly format as your output video format. There, you can take WMV as your output video format. If you prefer high definition videos, move your mouse pointer to "HD Video" and then choose HD WMV. To get the more compressive file, "MP4" and "HD MP4" can be your better choice.
Actually, it's not as difficult as you imagine. What you need is a just a common video converter like Dimo Video Converter Ultimate to help you watch MOV on Windows Media Player without any hassle. And you could get wonderful output files and never worry about out of audio/video sync. More than that, it also provides an access to touch up QuickTime MOV videos, which including trimming, cropping, appending artistic effects and more. If you are Mac users, please turn to Dimo Video Converter Ultimate for Mac (El Capitan, macOS Sierra included). The guide below will teach you how to convert and import MOV to Windows Movie Maker so you can make engaging movies with MOV, MP4, WMV and other video files.Free Download Dimo Video Converter Ultimate (Win/Mac): Other Download:
How to convert QuickTime MOV to Windows Media Player?Step 1. Add QuickTime MOV videoStart up the QuickTime MOV to Windows Media Player converter, and then click "Add File" to import all QuickTime MOV files.Step 2. Choose output compatible format with Windows Media PlayerClick the "Select Format" menu, select Windows Media Player friendly format as your output video format. There, you can take WMV as your output video format. If you prefer high definition videos, move your mouse pointer to "HD Video" and then choose HD WMV. To get the more compressive file, "MP4" and "HD MP4" can be your better choice. Tips: The smart MOV file converter additionally offers some useful edit functions to enhance your video. Click the "Edit" button to explore more features with Dimo Video Converter Ultimate.STEP 3. Start converting QuickTime MOV to Windows Media PlayerClick "Start" button to enable QuickTime MOV to WMV/MP4 conversion for playing with Windows Media Player. The conversion process will take a while, and you'll see an encoding progress bar.Once finished, click the "Open" button in the main interface and you can locate the encoded MOV files effortlessly. And then you are able to use these files in Windows Media Player as you want.Free Download or Purchase Dimo Video Converter Ultimate: Need the lifetime version to work on 2-4 PCs so that your friends and family can instantly broaden their entertainment options? Please refer to the family license here. Kindly Note:The price of Dimo Video Converter Ultimate for Windows is divided into 1 Year Subscription, Lifetime/Family/Business License: $43.95/Year; $45.95/lifetime license; $95.95/family license(2-4 PCs); $189.95/business pack(5-8 PCs). Get your needed one at purchase page.Contact us or leave a message at Facebook if you have any trouble to convert QuickTime MOV for importing to Windows Media Player as you want.Related Articles:
Source: Some MKV Files Not Playing on LG TV
Tips: The smart MOV file converter additionally offers some useful edit functions to enhance your video. Click the "Edit" button to explore more features with Dimo Video Converter Ultimate.STEP 3. Start converting QuickTime MOV to Windows Media PlayerClick "Start" button to enable QuickTime MOV to WMV/MP4 conversion for playing with Windows Media Player. The conversion process will take a while, and you'll see an encoding progress bar.Once finished, click the "Open" button in the main interface and you can locate the encoded MOV files effortlessly. And then you are able to use these files in Windows Media Player as you want.Free Download or Purchase Dimo Video Converter Ultimate: Need the lifetime version to work on 2-4 PCs so that your friends and family can instantly broaden their entertainment options? Please refer to the family license here. Kindly Note:The price of Dimo Video Converter Ultimate for Windows is divided into 1 Year Subscription, Lifetime/Family/Business License: $43.95/Year; $45.95/lifetime license; $95.95/family license(2-4 PCs); $189.95/business pack(5-8 PCs). Get your needed one at purchase page.Contact us or leave a message at Facebook if you have any trouble to convert QuickTime MOV for importing to Windows Media Player as you want.Related Articles:
Source: Some MKV Files Not Playing on LG TV
Virtual reality is difficult to understand until you try it for yourself. But when you hurried to jump on the crazy train to Rift CV1 valley, you found you can't get the proper way to let yourself immerse into 3D VR world with Oculus Rift CV1. Don't be chaotic, here can offer you the secret key to open the pandora 3D visual world, throught importing all your3D movie library to Oculus Rift CV1 VR without any hassles. Why Can't Watch 3D Movies on Oculus Rift CV1?Oculus Rift CV1 by default supports most common file formats including MKV, MP4, AVI, and FLV. When it comes to playing 3D videos or movies, Oculus Rift CV1 requires either side-by-side or top-to-bottom (top down), but many movies are not that format. Thus, the workaround is to download a 3D video converter program that can convert 3D movies to Oculus Rift CV1 supported formats.To finish task, here we recommended you to try Dimo Video Converter Ultimate, a professional video converter for Rift CV1. It enables you convert various 3D movies including 3D Blu-ray, 3D YouTube FLV, 3D YIFY, 3D MTS, 3D MKV, etc. to Oculus Rift CV1/DK2 or Oculus video format at super fast speed. It supports Anaglyph, Top-Bottom, Side-by-Side for Oculus Rift, 3D TV, Gear VR, DayDream View, HTC Vive, Google Cardboard, etc. with the best quality.What's more, with the built-in editor, you can trim, crop, add watermark, adjust special effect to your 3D video, so that you get the very part and effects at your will. If you are a Mac user, you can turn to Dimo Video Converter Ultimate for Mac (OS Sierra, OS X El Capitan included), which has the same function as the Windows version. Free download the right version and see easy steps to watch 3D movies on Oculus Rift CV1 with Oculus Video effortlessly. Free Download Dimo Video Converter Ultimate (Win/Mac): Other Download:
How to re-encode and watch 3D movies on Oculus Rift CV1 Step 1. Load 3D moviesLaunch the VR video converter for Rift CV1, and click "Add File" button to import your source materials 3D media files.
Why Can't Watch 3D Movies on Oculus Rift CV1?Oculus Rift CV1 by default supports most common file formats including MKV, MP4, AVI, and FLV. When it comes to playing 3D videos or movies, Oculus Rift CV1 requires either side-by-side or top-to-bottom (top down), but many movies are not that format. Thus, the workaround is to download a 3D video converter program that can convert 3D movies to Oculus Rift CV1 supported formats.To finish task, here we recommended you to try Dimo Video Converter Ultimate, a professional video converter for Rift CV1. It enables you convert various 3D movies including 3D Blu-ray, 3D YouTube FLV, 3D YIFY, 3D MTS, 3D MKV, etc. to Oculus Rift CV1/DK2 or Oculus video format at super fast speed. It supports Anaglyph, Top-Bottom, Side-by-Side for Oculus Rift, 3D TV, Gear VR, DayDream View, HTC Vive, Google Cardboard, etc. with the best quality.What's more, with the built-in editor, you can trim, crop, add watermark, adjust special effect to your 3D video, so that you get the very part and effects at your will. If you are a Mac user, you can turn to Dimo Video Converter Ultimate for Mac (OS Sierra, OS X El Capitan included), which has the same function as the Windows version. Free download the right version and see easy steps to watch 3D movies on Oculus Rift CV1 with Oculus Video effortlessly. Free Download Dimo Video Converter Ultimate (Win/Mac): Other Download:
How to re-encode and watch 3D movies on Oculus Rift CV1 Step 1. Load 3D moviesLaunch the VR video converter for Rift CV1, and click "Add File" button to import your source materials 3D media files.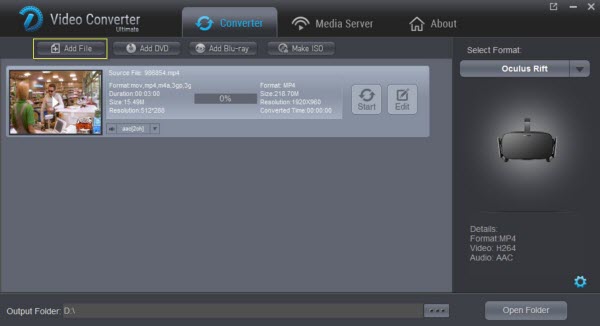 Step 2. Select output formatIt is time to select the output file format type that will be Oculus Rift VR device in your case. Click "Select Format" and select "Oculus Rift" from "Device > VR" category as the output format. It works on Oculus Rift CV1 perfectly. Choose the output file folder where you need to save back your video file after conversion. Tip: Click Settings to adjust the parameters like video codec, video bitrate, video frame rate, audio sample rate, audio channel. 1920x1080 compressed side-by-side 3D should be resampled to 1920x540 resolution full side-by-side resolution. And keep audio in AAC or MP3.Step 3. Set the Matching 3D modesThe 3D Video Converter program provides three kinds of 3D effects, you can choose one that match your Oculus Rift CV1, such as Side-by-side (Left-Right) or Top-Bottom.Step 4. Start conversionClick the "Start" button to start and finish the 3D video to Rift CV1 conversion. After the conversion, click "Open" button to quickly locate the generated media file. Now you can transfer the converted 3D videos to play with Rift CV1 easily.Follow the official instruction to play 360 videos or 3D content in Oculus rift:1. Label 3D videos and 360 videos as:a. The 360 videos are here implemented using advanced spherical mapping; for this you simply need to add _360 at the end of your video file name. After completion of this labelling process you can move these videos to video folder as per need.b. In case of 3D panoramic videos, you need to add labels as per top, bottom, left and right conventions. The extensions at the end of video file name will be "_360_TB.mp4", "_360_RL.mp4", "_360_BT.mp4" and "_360_LR_mp4" etc. It is important to provide proper names to these videos files for easy access at later stages.2. Here are the steps to transfer your videos to Oculus Videosa. Open the Windows system drive that is probably C drive in most of the cases.b. Now access Users folder.c. Choose user files option ahead.d. Finally locate and then open Videos folder and paste your videos there. For the next time, whenever you will launch the Oculus Video then these transferred videos will immediately and automatically appear on My Videos section of your system.Free Download or Purchase Dimo Video Converter Ultimate: Need the lifetime version to work on 2-4 PCs so that your friends and family can instantly broaden their entertainment options? Please refer to the family license here. Kindly Note:The price of Dimo Video Converter Ultimate for Windows is divided into 1 Year Subscription, Lifetime/Family/Business License: $43.95/Year; $45.95/lifetime license; $95.95/family license(2-4 PCs); $189.95/business pack(5-8 PCs). Get your needed one at purchase page.Related Software:BDmate (Win/Mac)Lossless backup Blu-ray to MKV with all audio and subtitle tracks; Rip Blu-ray to multi-track MP4; ConvertBlu-ray to almost all popular video/audio formats and devices; Copy Blu-ray to ISO/M2TS; Share digitized Blu-ray wirelessly.DVDmate (Win/Mac)A professional DVD ripping and editing tool with strong ability to remove DVD protection, transcode DVD to any video and audio format, and edit DVD to create personal movie.Videomate (Win/Mac)An all-around video converter software program that enables you to convert various video and audio files to formats that are supported by most multimedia devices.8K Player (Win/Mac)A mixture of free HD/4K video player, music player, Blu-ray/DVD player, video recorder and gif maker. Contact us or leave a message at Facebook if you have any issues.Related Articles:
Source: Watch Any 3D Content on Oculus Rift CV1 in Oculus Video
Step 2. Select output formatIt is time to select the output file format type that will be Oculus Rift VR device in your case. Click "Select Format" and select "Oculus Rift" from "Device > VR" category as the output format. It works on Oculus Rift CV1 perfectly. Choose the output file folder where you need to save back your video file after conversion. Tip: Click Settings to adjust the parameters like video codec, video bitrate, video frame rate, audio sample rate, audio channel. 1920x1080 compressed side-by-side 3D should be resampled to 1920x540 resolution full side-by-side resolution. And keep audio in AAC or MP3.Step 3. Set the Matching 3D modesThe 3D Video Converter program provides three kinds of 3D effects, you can choose one that match your Oculus Rift CV1, such as Side-by-side (Left-Right) or Top-Bottom.Step 4. Start conversionClick the "Start" button to start and finish the 3D video to Rift CV1 conversion. After the conversion, click "Open" button to quickly locate the generated media file. Now you can transfer the converted 3D videos to play with Rift CV1 easily.Follow the official instruction to play 360 videos or 3D content in Oculus rift:1. Label 3D videos and 360 videos as:a. The 360 videos are here implemented using advanced spherical mapping; for this you simply need to add _360 at the end of your video file name. After completion of this labelling process you can move these videos to video folder as per need.b. In case of 3D panoramic videos, you need to add labels as per top, bottom, left and right conventions. The extensions at the end of video file name will be "_360_TB.mp4", "_360_RL.mp4", "_360_BT.mp4" and "_360_LR_mp4" etc. It is important to provide proper names to these videos files for easy access at later stages.2. Here are the steps to transfer your videos to Oculus Videosa. Open the Windows system drive that is probably C drive in most of the cases.b. Now access Users folder.c. Choose user files option ahead.d. Finally locate and then open Videos folder and paste your videos there. For the next time, whenever you will launch the Oculus Video then these transferred videos will immediately and automatically appear on My Videos section of your system.Free Download or Purchase Dimo Video Converter Ultimate: Need the lifetime version to work on 2-4 PCs so that your friends and family can instantly broaden their entertainment options? Please refer to the family license here. Kindly Note:The price of Dimo Video Converter Ultimate for Windows is divided into 1 Year Subscription, Lifetime/Family/Business License: $43.95/Year; $45.95/lifetime license; $95.95/family license(2-4 PCs); $189.95/business pack(5-8 PCs). Get your needed one at purchase page.Related Software:BDmate (Win/Mac)Lossless backup Blu-ray to MKV with all audio and subtitle tracks; Rip Blu-ray to multi-track MP4; ConvertBlu-ray to almost all popular video/audio formats and devices; Copy Blu-ray to ISO/M2TS; Share digitized Blu-ray wirelessly.DVDmate (Win/Mac)A professional DVD ripping and editing tool with strong ability to remove DVD protection, transcode DVD to any video and audio format, and edit DVD to create personal movie.Videomate (Win/Mac)An all-around video converter software program that enables you to convert various video and audio files to formats that are supported by most multimedia devices.8K Player (Win/Mac)A mixture of free HD/4K video player, music player, Blu-ray/DVD player, video recorder and gif maker. Contact us or leave a message at Facebook if you have any issues.Related Articles:
Source: Watch Any 3D Content on Oculus Rift CV1 in Oculus Video