Friday, April 7, 2017

How to Edit MP4 File in Camtasia Studio

You would handle kinds of video files daily, including YouTube MP4 videos, Sony MP4 Camcorder videos(XDCam-EX), GoPro MP4 footage, game MP4 recordings with OBS(Open Broadcaster Software), etc. And in order to get more wonderful videos, you probably will choose to edit .mp4 files with Camtasia which is a good option your screen and edit your videos to get professional-like videos before sharing to YouTube or FaceBook. While, there are dozen of .mp4 files can't be imported into Camtasia software, for the complex video codec of MP4 files. This article will be along with you to root the trouble and solution out here. 


Some people including you may be confused: Camtasia says it supports MP4 at Techsmith support site, but why I can't import MP4 to Camtasia Studio? Well, that's because Camtasia prefers AVC/h.264 at no more than 30 frames per second instead of others while MP4 can contain various video codecs. So if you MP4 files are not accepted by Camtasia Studio, it's probably because of the video codec incompatibility. 

To fix the problem, you'll need to convert those MP4 to a more editing-friendly format for Camtasia Studio with a MP4 file converter app. Dimo Video Converter Ultimate which is an easy-to-use MP4 converter for you, which can help you change MP4 into a Camtasia Studio accepted MPEG-1/MOV/MP4 with least quality loss. You should then be able to import the new file into Camtasia Studio with smooth editing without any trouble. 

The all-in-one and easy-to-use toolkit can convert all other popular video formats like AVI, MOVMXF, WMV, MKV, FLV, ASF, M2TS, VOB, etc. to Camtasia Studio natively supported video formats on Windows (Windows 10 included) with fast encoding speed. For Mac users, just getDimo Video Converter Ultimate for Mac to get th job done. See how below about converting MP4 files to Camtasia Studio format. 

Free Download Dimo Video Converter Ultimate (Win/Mac): 


Other Download: 

How to Convert MP4 files for Editing in Camtasia Studio 9/8/7 

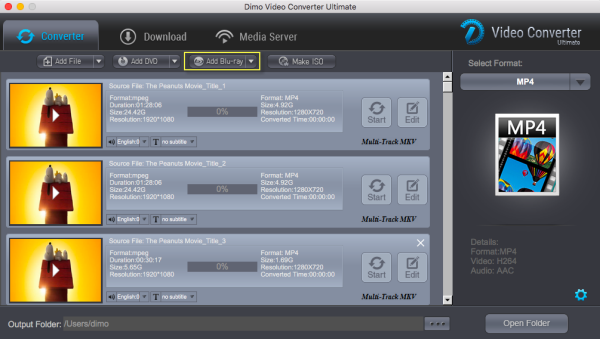
Step 1. Load .MP4 files 

Drag & drop MP4 files to the program directly. Or go to the "Add file" to locate the MP4 files you want to add. You can add several files to do conversion at the same time. 


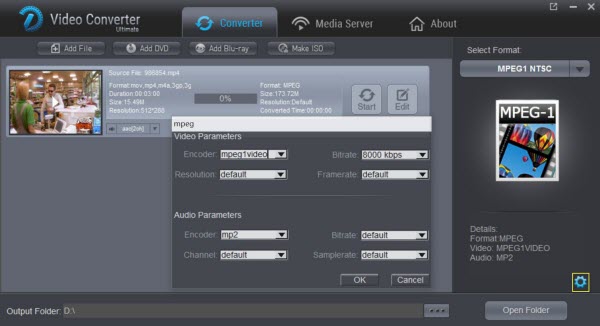
Step 2. Select the output format 

Click "Select Format" bar and then move your pointer to "Format" and turn to "HD Video" or "Video" and choose MPEG-1 or MOV as target format. Besides, you can also choose AVI, WMV, MP4, etc. if you want to get a relatively smaller output file. 

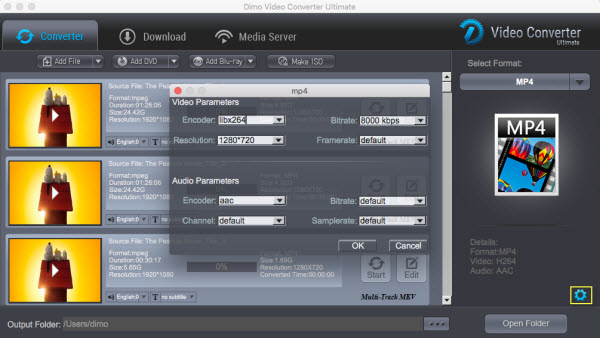
Step 3 (optional): Adjust the video, audio settings 

Click "Settings" to fix the frame rate, bitrate, video size, etc to your needs. If you want to edit in Camtasia Studio without having to render the clips while editing, all the frame sizes must be the same as the sequence settings. You can save a lot of render time by making all the clips the same size with this MOV video converter


Tip: Furthermore, you are provided some useful edit functions cropping, trimming, adding watermark, adjusting effects for pre-editing your video files so that you can simplify your Camtasia Studio editing. 

Step 3. Start MP4 to Camtasia Studio conversion 

Click the "Start" button to start the MP4 to Camtasia conversion. Just in a few minutes, you make it. 

Step 4. Import MP4 into Camtasia Studio 

After the conversion, click "Open" to locate the result videos and then launch Camtasia Studio and click "Import media" import the converted MP4 video into Camtasia Studio; prepare for editing. You will find that it's just a piece of cake to edit MP4 files in Camtasia Studio. 

After editing or recording, you can export video toCamtasia Studio for playing and sharing

Free Download or Purchase Dimo Video Converter Ultimate: 


Need the lifetime version to work on 2-4 PCs so that your friends and family can instantly broaden their entertainment options? Please refer to the family license here


Kindly Note: 

The price of Dimo Video Converter Ultimate for Windows is divided into 1 Year Subscription, Lifetime/Family/Business License: $43.95/Year; $45.95/lifetime license; $95.95/family license(2-4 PCs); $189.95/business pack(5-8 PCs). Get your needed one at purchase page

Related Software: 

BDmate (Win/Mac) 

Lossless backup Blu-ray to MKV with all audio and subtitle tracks; Rip Blu-ray to multi-track MP4; ConvertBlu-ray to almost all popular video/audio formats and devices; Copy Blu-ray to ISO/M2TS; Share digitized Blu-ray wirelessly. 

DVDmate (Win/Mac) 

A professional DVD ripping and editing tool with strong ability to remove DVD protection, transcode DVD to any video and audio format, and edit DVD to create personal movie. 

Videomate (Win/Mac) 

An all-around video converter software program that enables you to convert various video and audio files to formats that are supported by most multimedia devices. 

8K Player (Win/Mac) 

A mixture of free HD/4K video player, music player, Blu-ray/DVD player, video recorder and gif maker. 

Contact us or leave a message at Facebook if you have any issues. 

Related Articles: 

Source:A Guide to Get Blu-ray Movies onto Oculus Rift for Watching

Thursday, April 6, 2017

How to Get Blu-ray movies into Cloud Storage for Sharing

Blu-rays are trapped on physical platters. If you want to watch something, you have to find the disc, slide it into a Blu-ray player—or a computer with a Blu-ray drive—and flip your TV to the proper input. However, once you convert your Blu-ray movie library to digital files for storage in personal cloud online, you can make Blu-ray available through the network disk, Dropbox, Seagate personal cloud media storage, etc., and share it with your family members or access your Blu-ray movies at home or on the road. This article will focus on how to process Blu-ray to personal cloud conversion for backup and watching conveniently. 


With a fast and easy-to-use Blu-ray to cloud ripper, you will save your time and effort in establishing a complete and convenient online personal movie theater. Here Dimo Video Converter Ultimate for Mac is highly recommend which fully supports digitizing your Blu-rays to personal cloud compatible file type beforehand. 

Overall, it is the best Blu-ray ripping program that helps you effortlessly finish the Blu-ray conversion on Mac (OS Sierra supported) bypassing Blu-ray copy protection. With it, you can convert Blu-ray to almost all regular video formats for personal cloud like MP4, MOV, MKV, FLV, WMV, AVI, etc. and even extract MP3, WMA, FLAC, OGG, etc. audio from Blu-ray movies. 

Best of all, it allows you to copy your Blu-ray to hard drive in lossless mkv with keeping original structure or backup Blu-ray to ISO image file. If you are a Windows user, pls turn to Dimo Video Converter Ultimate. Now, download the software on computer and follow the guide below to start conversion. 

Free Download Dimo Video Converter Ultimate for Mac/Win: 


Other Download: 

Guide: Ripping Blu-ray for copying to Personal Cloud 

1. Insert Blu-ray disc to the drive, then launch the Blu-ray to cloud Converter and click the "Add Blu-ray" button to have the Blu-ray content imported. You can also add BDMV folder for converting. 


2. Click "Select Format" bar and choose a compatible format for Personal Cloud. MP4, MKV, MOV from "Format > Video" are the proper choice. 

Tip: With the right settings you can retain the quality of the original Blu-ray while also saving space. This is particularly helpful when streaming over your network, depending on your network quality. Simply click Settings bar and you can tweak the settings to your satisfaction and even save it as preset. 


3. Hit the "Start" button at the bottom of the main interface to start ripping Blu-ray movie to digital file accepted by your cloud storage device. 

How to Put the Converted Blu-ray Videos to Cloud Storage Device? 

Once being converted to digital files, your movie library can be stored/uploaded onto a server and streamed later for different uses. You can play the files directly online (but the Network speed is a deciding factor), and download them to local disks. Outstandingly, cloud service makes movies, music and photos more portable. Only if you have an online account, you can use the movies on your home PC, work PC and portable PC, stream it to an app, Chromecast, Smart TV, Roku player or a set-top box. 

Now you are able to view Blu-ray on iPhone, iPad, WDTV, PS4, Xbox One, Roku, etc. with the help of personal cloud. 

Free Download or Purchase Dimo Video Converter Ultimate for Mac/Win: 


Need the lifetime version to work on 2-4 Macs so that your friends and family can instantly broaden their entertainment options? Please refer to the family license here


Kindly Note: 

The price of Dimo Video Converter Ultimate for Mac is divided into 1 Year Subscription, Lifetime/Family/Business License: $43.95/Year; $45.95/lifetime license; $95.95/family license(2-4 Macs); $189.95/business pack(5-8 Macs). Get your needed one at purchase page

Contact us or leave a message at Facebook if you have any issues. 

Related Articles: 

Source: Watching 3D Blu-ray Movies on PSVR

Wednesday, April 5, 2017

How to Rip and Transfer DVD Collections to TiVo for Enjoyment

TiVo can be used for watching home movies, when the TiVo DVR is connected to a home network. Say you have some home movie on DVDs, but you want to watch DVD collection via TiVo instead of using the physical discs. Then you can "rip" these DVDs—or turn it into a movie file which is supported by Tivo on your computer—to put it for Tivo playback with ease. 


To convert DVD to TiVo more compatible video format like MPEG-2, here Dimo Video Converter Ultimate is recommended to fulfill the task. The program is an all-in-one video converter tool that lets you effortlessly rip Blu-ray, DVD and convert your video and audio files like AVI, VOB, WMV, FLV, MP4, MP3, etc. to Tivo format at ultra-fast speed without any quality loss. 

Besides, it can be used as TiVo media server so that you can transfer your TiVo recordings to your portable devices for enjoyment anywhere anytime, or a ISO maker to create ISO from Tivo shows. If you want to watch DVD files on TiVo from Mac, you can turn to Dimo Video Converter Ultimate for Mac (MacOS Sierra supported). Download the program and learn the tutorial. 

Free Download Dimo Video Converter Ultimate (Win/Mac): 


Other Download: 

Part I. Convert DVD to TiVo friendly format 

Step 1: Add DVD files > Insert the DVD disc to the DVD-ROM and click the "Add DVD" button to have movies uploaded to the program. Here you can also import Blu-ray discs, Blu-ray/DVD folders and video files to convert. 


Step 2: Choose TiVo device friendly format > Hit the drop-down list of "Select Format" to choose "Format -> Video -> MPEG-2 Video" as the best format. 

Tip: Set advanced settings (Optional) 

By clicking the Settings icon, you can adjust video and audio parameters like codec, bit rate, frame rate, sample rate, etc., in that way, you can take charge of the size and quality of the output files. In principle, the larger input values, the better output quality, but the corresponding larger file size. 


Step 3: Start converting DVD for TiVo > As soon as all the above settings are completed, you can press "Start" button to start DVD to MPEG-2 conversion. After conversion is done, simply click "Open" button to find generated output videos and then transfer it from your PC to TiVo for playback flawlessly. 

Part II. How to transfer home videos from PC to my TiVo? 

Preparation: Purchase the Home Networking Package, and download and install the TiVo Desktop software (which comes as part of the Home Networking Package). 

1. On your PC, open My Documents > My TiVo Recordings. 

NOTE: You can change the location of this folder under File > Preferences. 

2. Copy the home videos you wish to transfer to your TiVo into the My TiVo Recordings folder. 

3. These will now display in your TiVo Desktop’s Now Playing List. 

4. On your TiVo, navigate to TiVo Central > Now Playing List. 

5. Scroll down to the bottom of the list and select your "Now Playing on [YOUR PC]". 

6. Select the video you wish to transfer and follow the screen prompts to begin the transfer. 

7. While the video is transferring, a blue light will be lit on your TiVo media device. 

8. Once the blue light turns off, the video has finished transferring. You can find the transferred video in your TiVo Now Playing List. 

NOTE: Video can be played whilst transferring but network speed limitations may cause video to pause. Your TiVo media device will only transfer one file at a time; additional files will be queued for transfer later. 

After that, the ripped DVD videos will be transferred to TiVo automatically. Enjoy. 

Free Download or Purchase Dimo Video Converter Ultimate: 


Need the lifetime version to work on 2-4 PCs so that your friends and family can instantly broaden their entertainment options? Please refer to the family license here


Kindly Note: 

The price of Dimo Video Converter Ultimate for Windows is divided into 1 Year Subscription, Lifetime/Family/Business License: $43.95/Year; $45.95/lifetime license; $95.95/family license(2-4 PCs); $189.95/business pack(5-8 PCs). Get your needed one at purchase page
Contact us or leave a message at Facebook if you have any issues. 

Related Articles: 

Source: How to Rip Blu-ray to Play on Samsung TV

Tuesday, April 4, 2017

MP4 to PowerDirector - Easily Convert/Import MP4 to PowerDirector

Cyberlink claims that PowerDirector offer native support for MP4 format. The point here, sometimes still you will find it a painful experience to import MP4 files to PowerDirector (PD 15 Ultra/Ultimate/Ultimate Suite/Director Suite included) for editing. And there are frequently asked questions quoted below:

"Cannot import .mp4 into CyberLink PowerDirector 15 Ultra. I specifically checked the import formats of this software before I bought it, but now I cannot import them and the program cites an "unsupported format" error. Very frustrated and confused."

"I got a bunch of video recordings in .MP4 format that from my GoPro Hero 3 and Sony PMW-EX3. Whereas, when I wanna edit those MP4 footage in PowerDirector before sharing with my friends, I met problems: PD handled with the MP4 files so slowly and some files even couldn't be recognized. I couldn't edit my videos smoothly."


Actually, this is probably due to the MP4 file codec. CyberLink PowerDirector might not work with some MP4 files sometimes due to the codec issue or other reasons. Fortuantely, there is an easy way to fix the issue. To get PowerDirector work well with MP4 videos, you could adjust MP4 to PowerDirector supported video format. 

Along with some help from third-party software like Dimo Video Converter Ultimate (Windows 10 included), you can easily get the problem solved. With it, you can transcode MP4 to PD native editing-friendly format - MPEG-2/H.264 - ensuring maximum editing quality and efficiency when working with PowerDirector 15/14/13. An Avid preset is included for easy access. 

Meanwhile, this video app enables you to change MP4 to editable format for Pinnacle Studio, Adobe Premiere Pro, Sony Vegas, Windows Movie Maker, Avid Studio, Magix Movie Edit Pro, Camtasia StudioGoPro Studio and more other NLEs. Now download the program and follow the step-by-step gudie below to convert MP4 files to MPEG-2/H.264 for smoothly editing in PowerDirector.

Free Download Dimo Video Converter Ultimate (Win/Mac):


Other Download: 
Guide: Transcoding MP4 to PowerDirector for natively editing

Step 1. Install and launch MP4 Video Converter on your PC, and then import MP4 files to the converter.


Step 2. Click "Select Format" bar and choose "Editor > Adobe Premiere" as output format on the drop-down menu. Of course, you can also choose MPEG-2, MPEG-4, WMV from "Format > Video" or "Format > HD Video" as the output format.

Step 3. Click "Settings" button if you'd like to customize advanced audio and video parameters like Video Codec, aspect ratio, bit rate, frame rate, Audio codec, sample rate, audio channels. Here you are recommended to select MPEG-2 or H.264 from video encoder. Besides, this Mac MP4 video converter has some simple edit functions like cropping, trimming, adding effects/watermark etc. so you can touch up the video with basic video editing functions.


Step 4. Click "Start" button to start transcoding MP4 files to PowerDirector. With the MP4 to PowerDirector converter, you can easily encode MP4 files to CyberLink PowerDirector for editing. 

This software runs fast, so you can convert your source MP4 footages to PD in less time, and video and audio synchronization is perfectly guaranteed. After the conversion is completed, get the resulted files via clicking the Open button and then you can import converted MOV or MPG files to PowerDirector 15/14/13/12 for further editing without any hassle.

Free Download or Purchase Dimo Video Converter Ultimate:


Need the lifetime version to work on 2-4 PCs so that your friends and family can instantly broaden their entertainment options? Please refer to the family license here


Kindly Note:

The price of Dimo Video Converter Ultimate for Windows is divided into 1 Year Subscription, Lifetime/Family/Business License: $43.95/Year; $45.95/lifetime license; $95.95/family license(2-4 PCs); $189.95/business pack(5-8 PCs). Get your needed one at purchase page.

Related Software:

BDmate (Win/Mac)

Lossless backup Blu-ray to MKV with all audio and subtitle tracks; Rip Blu-ray to multi-track MP4; ConvertBlu-ray to almost all popular video/audio formats and devices; Copy Blu-ray to ISO/M2TS; Share digitized Blu-ray wirelessly.

DVDmate (Win/Mac)

A professional DVD ripping and editing tool with strong ability to remove DVD protection, transcode DVD to any video and audio format, and edit DVD to create personal movie.

Videomate (Win/Mac)

An all-around video converter software program that enables you to convert various video and audio files to formats that are supported by most multimedia devices.

8K Player (Win/Mac)

A mixture of free HD/4K video player, music player, Blu-ray/DVD player, video recorder and gif maker. 

Contact us or leave a message at Facebook if you have any issues.

Related Articles: